Live Template Wizard: Crafting Android Code with Ease

If you’re a developer, you might have noticed that you end up doing certain tasks repeatedly ( such as creating ViewModel, Activity, Fragment and etc.)
This can be as simple as creating a function or building a commonly used structure.
Doing these tasks repeatedly can be tiring. Live templates come to the rescue!
What are Live Templates in Android Studio?
Live templates are a feature in IntelliJ, which is also available in Android Studio. They help you add frequently used code patterns and constructs to your code quickly and intelligently.
This saves you time and effort, making you more productive. With autocomplete and less need for boilerplate code, reduce the cognitive burden on you.
Using Live Templates
To use a live template you start by typing in that template’s abbreviation. As you type, in the same way, you have code completion, you will see live template abbreviations show up in a dropdown.
There are three types of templates
- Simple template — contain only fixed plain text. When you expand a simple template, the text is automatically inserted into your source code, replacing the abbreviation.

// plain text for Live Template
fun main(args: Array<String>) {}- Parameterized templates — are Live Templates in Android Studio that contain variables which can be customized by the user. When you use a parameterized template, the variables are replaced by input fields where you can manually enter values, or the values are calculated automatically by IntelliJ IDEA.
override fun show$MODEL_NAME$($VALUE$: String) {
  text_$VALUE$.text = $VALUE$
  text_$VALUE$.visibility = View.VISIBLE
}
If you type “title” ,the result is —
override fun showTitle(title: String) {
  text_title.text = title
  text_title.visibility = View.VISIBLE
}
I will show you how to capitalize and insert ID into another later.
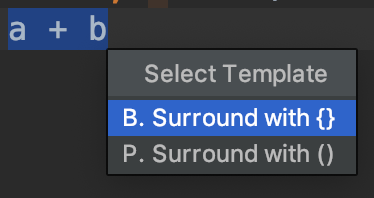
- Surround templates let you wrap a selected block of code with custom text. For example, typing “T” can insert a pair of tags. Use the shortcut ⌥ ⌘ J to open the Select Template popup and choose the template to wrap the selection with the custom text.

try {
    $SELECTION$
} catch ($EXCEPTION$ e) {
    e.printStackTrace()
}
Creating template
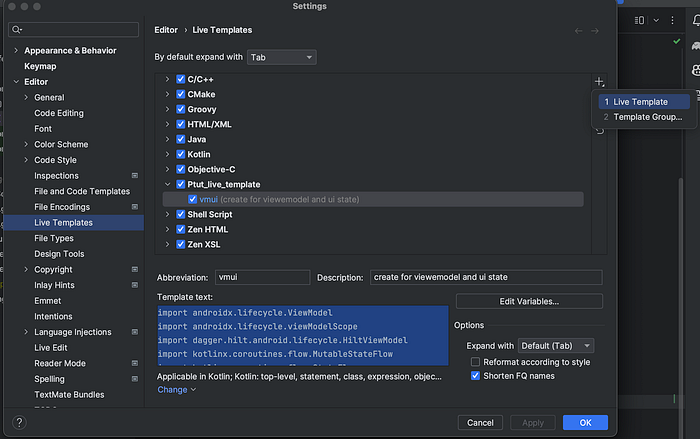
- First Go to Setting ‣ Editor ‣ Live Templates ‣ 1. Live Templates
- Type a name if you want to create in Abbreviation text box
- Write a code in Template text box.
- Define Applicable kotlin and setup Edit Template Variables
- Click “OK”

Viewing Live Templates
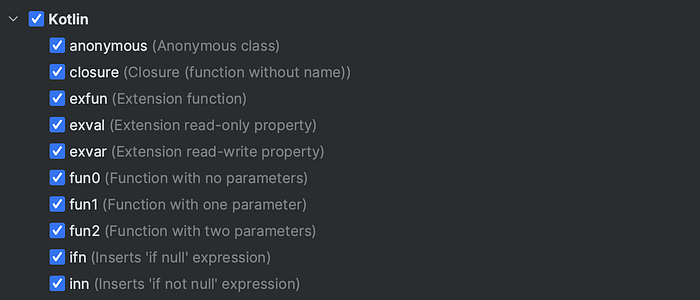
You can see the list of all live templates right in Android Studio. Go to Setting ‣ Editor ‣ Live Templates. This is where you can find and explore all the live templates available to you. You’ll see a list with collapsed items.

I navigate and click into “fun0”

Let deep dive into this.
- Abbreviation — is a short text that you type when you want to use a Live Template in Android Studio. It triggers the suggestion of the Live Template, which automatically inserts teamplate text into your code and replaces placeholders with values.
- Description — is a short explanation of what the template does.

- Template Text — the code that defines what will be inserted into your code when you use a Live Template in Android Studio. It can include placeholders for variables or expressions that will be filled in when the template is expanded.
- Application Define — a type of variable that allows you to define a global value that can be used throughout your code.
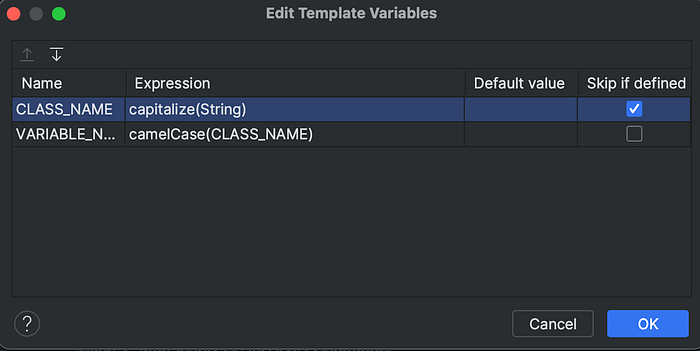
- Edit Template Variables — allows you to customize the variables that are included in a template when it’s expanded. This dialog appears when you use a Live Template that contains variables or placeholders, and allows you to specify the values for those variables.

You can choice Expression for naming pattern like this and specify a more complex expression to be used as the value of a variable or placeholder in a template.
Bonus
I will give Live template now I am using for “ScreenState” and “Compose Screen”
ScreenState Live Template text
import androidx.compose.runtime.State
import androidx.compose.runtime.mutableStateOf
import androidx.compose.ui.tooling.preview.PreviewParameterProvider
/**
 * "*" is use for hiding data.
 * ScreenStateCallBack and ScreenStateData is not library just only interface
 */
import com.***.ScreenStateCallBack
import com.***.ScreenStateData

class $CLASS_NAME$ScreenState(
    val data: $CLASS_NAME$Data,
    val delegate: $CLASS_NAME$Delegate
) {
    data class $CLASS_NAME$Data(
        val data: State<String> = mutableStateOf(""),
    ) : ScreenStateData<$CLASS_NAME$ScreenState>

    data class $CLASS_NAME$Delegate(
        val onTapBack: () -> Unit = {},
    ) : ScreenStateCallBack<$CLASS_NAME$ScreenState>
}

class $CLASS_NAME$PreviewProvider : PreviewParameterProvider<$CLASS_NAME$ScreenState> {
    override val values: Sequence<$CLASS_NAME$ScreenState>
        get() = sequenceOf(
            $CLASS_NAME$ScreenState(
                data = $CLASS_NAME$ScreenState.$CLASS_NAME$Data(),
                delegate = $CLASS_NAME$ScreenState.$CLASS_NAME$Delegate()
            ),
        )
}
Screen Live Template text
import android.annotation.SuppressLint
import androidx.compose.runtime.Composable
import androidx.compose.runtime.mutableStateOf
import androidx.compose.ui.tooling.preview.Preview
import androidx.compose.ui.tooling.preview.PreviewParameter

@SuppressLint("UnrememberedMutableState")
@Composable
fun $CLASS_NAME$Screen() {
    $CLASS_NAME$ScreenStateless(
        state = $CLASS_NAME$ScreenState(
            data = $CLASS_NAME$ScreenState.$CLASS_NAME$Data(
                data = mutableStateOf(""),
            ),
            delegate = $CLASS_NAME$ScreenState.$CLASS_NAME$Delegate(
                onTapBack = { },
            ),
        ),
    )
}

@Preview(
    showBackground = true,
)
@Composable
fun $CLASS_NAME$ScreenStateless(
    @PreviewParameter($CLASS_NAME$PreviewProvider::class)
    state: $CLASS_NAME$ScreenState,
) {}
ViewModel with UI State Live Template text
import androidx.lifecycle.ViewModel
import androidx.lifecycle.viewModelScope
import dagger.hilt.android.lifecycle.HiltViewModel
import kotlinx.coroutines.flow.MutableStateFlow
import kotlinx.coroutines.flow.StateFlow
import kotlinx.coroutines.flow.asStateFlow
import kotlinx.coroutines.Dispatchers
import kotlinx.coroutines.launch
import javax.inject.Inject

@HiltViewModel
class $CLASS_NAME$ViewModel @Inject constructor() : ViewModel() {

    private val _$VARIABLE_NAME$StateFlow = MutableStateFlow($CLASS_NAME$UiState.Loading)
    val $VARIABLE_NAME$StateFlow: StateFlow<$CLASS_NAME$>
        get() = _$VARIABLE_NAME$StateFlow.asStateFlow()

    init {
        load$CLASS_NAME$Data()
    }

    private fun load$CLASS_NAME$Data() {
        viewModelScope.launch(Dispatchers.IO) {
            // Code to load data goes here
        }
    }
}

sealed interface $CLASS_NAME$UiState {
    object Loading : $CLASS_NAME$UiState
    data class $CLASS_NAME$Data(
        val items: List<Any>
    ) : $CLASS_NAME$UiState
    data class Error(
        val errorMessage: String
    ) : $CLASS_NAME$UiState
}
This one has two Environment Template variables.

This is the end of using Live Template.
Do you have any questions that you would like to discuss or ask freely?
See you next time, bye-bye 👋
